Jump to content

Welcome to SDR Garage Forums
Register now to gain access to all of our features. Once registered and logged in, you will be able to create topics, post replies to existing threads, give reputation to your fellow members, get your own private messenger, post status updates, manage your profile and so much more. If you already have an account, login here - otherwise create an account for free today!
Photo

Mestizo's 92 Nissan 240SX Coupe Build Thread


  • Please log in to reply
527 replies to this topic

#301
mestizo

mestizo

    Administrator

  • Admin
  • PipPip
  • 1456 posts
Yup yup I have some updates. It's been a over a month but I finally got my kit, I ended up with a B Magic D1 series full kit. It's basically a Vertex knock off kit, I would love to have the real deal Vertex but I can't afford that right now.

Anyways at the moment I am just fitting the kit to the car, so far it fits ok but not perfect. This is to be expected since I bought cheaper aero. The rear and side's fit fine but the front bumper was short about 1/4 inch on both sides so I had to do a lil work to get it to fit. Now I need to do a lil bit of body work/fiber glass filling and the car should be ready for paint. Now on to the what everyone wants... pics.

Kit unpacked and waiting to get fitted.


After some thinking I decided that the lower portion of my front fenders were unnecessary so I decided to cut them off, plus it makes it easier to get the front bumper on and off. This what it looked like before cutting, I used masking tape to make a perfectly straight line to cut on.


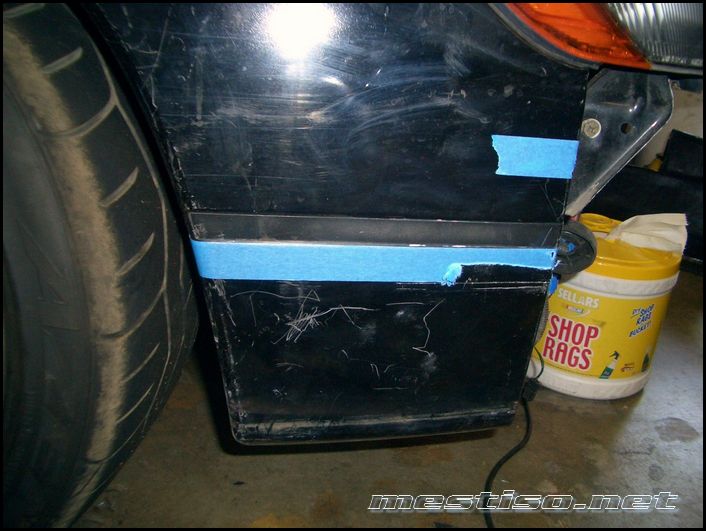
This is the final result.


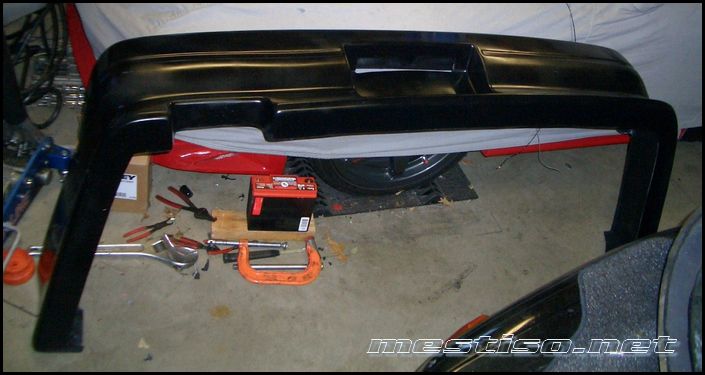
Fitting the front bumper and you can see the spot's I had to cut to get the clearance I needed.


Side skirts, lol these are just hanging on the car cuz I didn't have time to fit them yet.


Rear bumper, this fit the best of all but there were some small cracks in it from shipping. No problem tho i'll just fiber them up and they will be good to go.


#302
Copilot

Copilot

    Wait... How old are you again?!

  • Known Members
  • PipPip
  • 216 posts
Looks Good!!! So when are you gonna let me take the car under the cover for a few days????

00 RL Dumped on Type S wheels Stock as can be....
03 Hoe 4x4 on them stock 16s wit KnN intake and a magnaflow....HOTNESS

#303
mestizo

mestizo

    Administrator

  • Admin
  • PipPip
  • 1456 posts
QUOTE (LGND2NV @ Sep 28 2008, 12:18 AM) <{POST_SNAPBACK}>
Looks Good!!! So when are you gonna let me take the car under the cover for a few days????


LOL um I'll have to think about that one for a while. whistle.gif

Well I did some work to the car today since I no longer have a job, thanks to economy and my cousin I no longer have a source of income. So with that being said updates will be slow till i find another job. But at least I have a some extra time to get shit done on the car.

I got the kit mounted up completly, now I can start doing some body work and sanding to the car/kit in order to get it ready for paint. I also got my rear tail lights today, man these things look sick! I installed them but it was too dark to take good pics of them.

New tail lights!


The front is still a bit off, but it's mounted so I can start sanding and refiberglass the cuts I made.


#304
Sideways~S14

Sideways~S14

    Member

  • Known Members
  • PipPip
  • 579 posts
  • Gender:Male
  • Location:Citrus Heights
  • Interests:My Car, Import cars, and r/c cars
Weird haven't seen your car in awhile but looks good I wanna see some pics with those tail lights they look SICK! Must say the kit looks clean it doesn't seem to over the top or anything just clean

#305
mestizo

mestizo

    Administrator

  • Admin
  • PipPip
  • 1456 posts
Yea I have never been a fan of super agressive kits. I'll get some pics of the tail lights later today and post em up.

#306
mestizo

mestizo

    Administrator

  • Admin
  • PipPip
  • 1456 posts
Pics of the tail lights... the camera can't really do justice to the color of the lights.


#307
Lek Lek

Lek Lek

    Heavenly Drifter

  • Members
  • PipPip
  • 56 posts
  • Gender:Male
  • Location:West Sac Sliding to Heaven
Those tailights are dope. I wanna get the ones for the Corolla. They look like the Redlines but in that style.

You should get some aero side-view mirrors!

#308
mestizo

mestizo

    Administrator

  • Admin
  • PipPip
  • 1456 posts
Yea those lights look sick on the back of the corolla's only problem is they dont have the center part. A guy that Andrew and I know has them on his 86 and they look so clean.

#309
Copilot

Copilot

    Wait... How old are you again?!

  • Known Members
  • PipPip
  • 216 posts
Shit is looking sick.....tail lights remind me of the integras tail lights. Did the brakes work okay?

00 RL Dumped on Type S wheels Stock as can be....
03 Hoe 4x4 on them stock 16s wit KnN intake and a magnaflow....HOTNESS

#310
mestizo

mestizo

    Administrator

  • Admin
  • PipPip
  • 1456 posts
LOL yea 240 coupe tails look just like DA Integra tails, and yes those brakes worked great thanks bro.

#311
Just Droo

Just Droo

    Member

  • Known Members
  • PipPip
  • 134 posts
  • Gender:Male
  • Location:Sacramento
It's looking really good man. Everything is coming together nicely. I checked out the vertex stuff for the 14 too. It's stoooopid expensive. Like 2 G's for the whole kit. Think I'll end up doing the version select kit.

#312
mestizo

mestizo

    Administrator

  • Admin
  • PipPip
  • 1456 posts
Yea real deal Vertex is $$$$$, but Version Select stuff fits really well and is only about 800-900 for the full kit. I would have gotten the Version Select kit for my car but for 2nd time they were out of stock on the Type II kit that i wanted which is why I went with the B Magic kit instead.

#313
Just Droo

Just Droo

    Member

  • Known Members
  • PipPip
  • 134 posts
  • Gender:Male
  • Location:Sacramento
Cool cool. I am going to start piecing things together today. What are you up to today?

#314
mestizo

mestizo

    Administrator

  • Admin
  • PipPip
  • 1456 posts
Nothing really i'll shoot u a text here in a few mins.

#315
Copilot

Copilot

    Wait... How old are you again?!

  • Known Members
  • PipPip
  • 216 posts
Whats up with some stickers??? We could be plastering the hoe with em.

00 RL Dumped on Type S wheels Stock as can be....
03 Hoe 4x4 on them stock 16s wit KnN intake and a magnaflow....HOTNESS

#316
mestizo

mestizo

    Administrator

  • Admin
  • PipPip
  • 1456 posts
Stickers? Huh, I'm lost?

On a side note did you notice ur screen name and member group? Maybe even ur title, LOL. I made some changes to the site and how the members are recognized. Also gave some super powers to Jon, Andrew and Jahi since they are the mods on here, so watch out cuz if you piss them off they can edit/delete posts and topics, change ur member title/screen name and even ban you if they want to.

#317
Copilot

Copilot

    Wait... How old are you again?!

  • Known Members
  • PipPip
  • 216 posts
LMAO at the title...didnt even notice that. Stickers meaning ill will rock like your site or jons site hell even infinit stuff again....BTW mods are gay.


lmao j/p

00 RL Dumped on Type S wheels Stock as can be....
03 Hoe 4x4 on them stock 16s wit KnN intake and a magnaflow....HOTNESS

#318
mestizo

mestizo

    Administrator

  • Admin
  • PipPip
  • 1456 posts
Well Jonnie decided to light a fire under my ass to get some shit done on my car. Cool thing is the majority of what we are doing is free so it's just a matter of having the time... lol which I have a lot of now that I don't have a job. Anyways, we pulled the KA out yesterday and started cleaning the seam sealer out of the body seams so Jon can stitch weld the engine bay. Once we are done with that I'm going to clean the bay and paint it with a black epoxy primer. Now I can install my aluminum steering bushing as well while the motor is out. WOOT!!! Stiffness is going to be acheived! lol

Pulling the KA.


Jon and I scraping the top layer of seam sealer off.


This tool is fuckin great for getting the majority of the sealer off, it worked so well you could almost weld the seams just using this thing.


Now after using a wire brush to remove the remaining bit's of sealer and paint on the seams.


#319
Jonnie Fraz

Jonnie Fraz

    The Fab Man!

  • Gods of Mestiso.net
  • PipPip
  • 211 posts

Sparks will be flying today...lol construction.gif

#320
mestizo

mestizo

    Administrator

  • Admin
  • PipPip
  • 1456 posts
QUOTE (Jonnie Fraz @ Oct 19 2008, 09:59 AM) <{POST_SNAPBACK}>
Sparks will be flying today...lol construction.gif


LOL yup indeed the sparks did fly today!!!!

Well I got a bunch of pics for everyone, we did some more cleaning up of the seams, then welded everything up, pulled off the rusted out battery tray and cut some bigger holes for my intercooler piping. Also once we got all that done we installed my aluminum steering bushing. All I can say is HOLY SHIT the front end of my car is super stiff, lol even with just flexing some of the panels by hand before and after you can really feel the difference. Next up I need to clean up the holes for the intercooler and fix the area around the battery tray, once that is done I can pressure wash the bay and spray it with the black epoxy primer. Ok well enough explantion of things it's time for pics.

More of Jon and I cleaning up the seams.


Clean seams! lol


Here you can see the rusted ass battery tray was removed and left a rusted beat up lower panel.


Now for the welds!


Wooohoooo!!! Almost done!


Now for the plasma cutter to make some quick ruff cuts for my intercooler piping to pass through. Later I'll hit these up with a grinder to clean them up.


Cut out some of the battery tray area that was all fucked up, Jon is gonna cut some new sheet metal and close the hole in a lil bit later on.


This is the aluminum steering column bushing, S14's dont have this bushing however S13's do so changing it makes the steering much more responsive and solid.


Here is where the bushing is located, right beneath the brake booster in the engine bay, you just need to take loose the 2 lock nuts from the bushing, then pull the steering knucle off and the lower part of the column will just pull out.


Now you can see the rubber bushing on the right of the column.


Here you can see the rubber bushing next to the column with the new aluminum bushing in place.


7 user(s) are reading this topic

0 members, 7 guests, 0 anonymous users